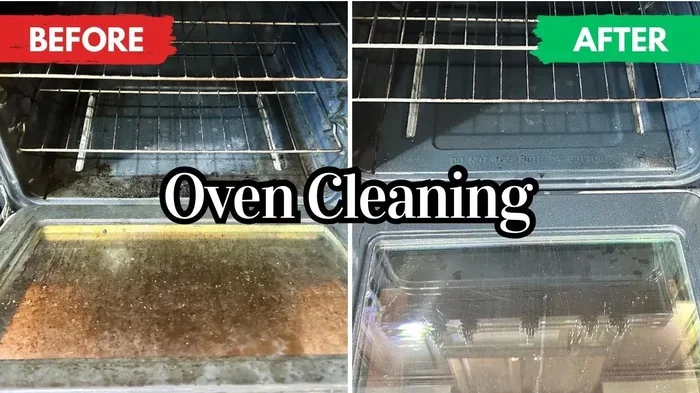
How To Clean Caked On Grease In Oven Fast And Easy
Cleaning caked on grease in oven is easier than you think with the right tools and techniques. This guide covers everything from natural solutions like baking soda and vinegar to step-by-step scrubbing methods that actually work. You’ll learn how to tackle tough stains, prevent future buildup, and keep your oven looking brand new without harsh chemicals.
Learning how to clean caked on grease in oven doesn’t have to be a dreaded chore. Whether you’ve neglected your oven for weeks or are dealing with months of built-up grime, the right approach makes all the difference. This guide walks you through simple, proven methods using items you likely already have at home. You’ll discover the best cleaning solutions, tools, and techniques to restore your oven to like-new condition. Keep reading to find the fastest and most effective way to tackle even the toughest baked-on grease.
A greasy oven is more than just a cosmetic problem. Built-up grease affects how your oven heats, creates unpleasant odors, and can even become a fire hazard over time. The good news is that you don’t need expensive store-bought products to get the job done. With a few household staples and some elbow grease, your oven will look and smell fresh again. Let’s dive into the methods that actually work.
Key Takeaways
- Baking soda and vinegar are the most effective and affordable natural cleaners for caked on grease in oven
- Soaking oven racks in hot soapy water loosens baked-on grease fast
- Steam cleaning softens tough stains before you even start scrubbing
- Regular maintenance with oven liners prevents heavy grease buildup over time
- Avoid harsh chemical sprays when gentle household items do the job safely
- Patience and soaking time are the secrets to removing the toughest baked-on grime
📑 Table of Contents
- Why Grease Builds Up Inside Your Oven
- What You Need Before You Start
- How To Clean Caked On Grease In Oven: A Complete Step-by-Step Guide
- Comparison: Which Cleaning Method Works Best?
- Natural Cleaning Solutions For Tough Grease
- Preventing Grease Buildup For Good
- When To Call A Professional Or Consider Replacement
- Conclusion
Why Grease Builds Up Inside Your Oven
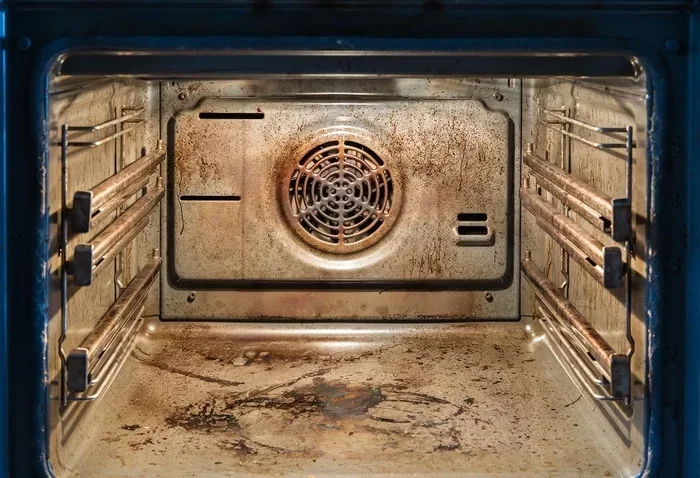
Understanding why grease accumulates helps you prevent it from becoming a bigger problem. Every time you cook, fats and oils splatter onto the interior surfaces of your oven. Over time, these splatters heat, cool, and reheat, creating a hardened layer of baked-on grease that’s tough to remove.
How Food Splatter Creates Tough Stains
When you roast meat or bake greasy foods, the juices and fats don’t stay on the food. They fly. These tiny droplets land on the oven walls, the back panel, and even the oven door. At first, they’re easy to wipe away. But after a few cooking cycles, the heat transforms them into a hard, sticky crust that clings stubbornly to every surface.
The oven door is especially prone to grease buildup because it faces the food directly. Steam and oils escape through the oven cavity and settle on the glass. This creates a filmy, cloudy layer that gets harder to remove the longer you ignore it. Regularly wiping down the door after cooking can save you a lot of trouble later.
The Science Behind Baked-On Grease
Here’s why baked-on grease is so hard to remove. When fats reach high temperatures, they undergo a process called polymerization. This means the oil molecules bond together and form a hard, plastic-like coating on your oven surfaces. That’s why simple wiping doesn’t work once grease has been through a few cooking cycles.
You need a cleaning agent that can break down these polymerized bonds. That’s where baking soda, vinegar, and other natural degreasing agents come in. They chemically react with the hardened grease to soften and dissolve it, making removal much easier. This is the science behind every effective oven grease cleaning method.
What You Need Before You Start
Before you begin, gather your supplies. Having everything ready makes the process faster and less frustrating. You don’t need anything fancy. Most of these items are already in your kitchen.
Essential Cleaning Supplies
- Baking soda – your best friend for cutting through grease
- White vinegar – a natural degreaser and deodorizer
- Dish soap – cuts through surface grease easily
- Warm water – helps dissolve and loosen grime
- Spray bottle – for applying solutions evenly
- Scrub brush or sponge – for working the grime loose
- Microfiber cloths – for wiping and polishing
- Rubber gloves – protect your hands from harsh residue
Safety Precautions
Always make sure your oven is completely cool before you start cleaning. Never mix bleach with vinegar or ammonia-based cleaners. If you’re using a commercial oven cleaner spray, make sure the area is well-ventilated. Wear gloves and avoid touching your face while applying any cleaning solution. These simple precautions keep you safe while you work.
How To Clean Caked On Grease In Oven: A Complete Step-by-Step Guide
Now let’s get into the actual cleaning process. Follow these steps in order for the best results. Each step builds on the last, so don’t skip ahead.
Step 1: Remove the Oven Racks
Start by pulling out all removable parts. Take out the oven racks, the oven tray, and any other components you can lift out. Soaking these separately gives you better access to the oven interior and lets you clean each piece thoroughly. Place the racks in your sink or a large basin filled with hot, soapy water.
Let the racks soak for at least 30 minutes. The hot water softens the baked-on grease and makes scrubbing far less effort. If the racks are extremely greasy, add a tablespoon of dish soap directly to the water and let them soak for a couple of hours.
Step 2: Apply Your Cleaning Solution
For the oven interior, make a thick paste using three parts baking soda to one part water. Spread this paste generously over all the greasy surfaces inside the oven. Focus on the areas with the heaviest caked-on grease. Avoid spreading the paste on the heating elements, as baking soda can damage them when heated.
If you prefer a liquid approach, mix equal parts water and white vinegar in a spray bottle. Spray the interior surfaces generously. The fizzing reaction between baking soda and vinegar is incredibly effective at breaking down tough grease stains. Let the solution sit for at least 15 to 30 minutes.
Step 3: Let It Sit and Soak
Patience is the secret ingredient here. The longer your cleaning solution sits on the grease, the easier the removal process becomes. For moderate buildup, 30 minutes is usually enough. For heavily caked-on grease, leave the paste on for several hours or even overnight.
During this time, the baking soda works to dissolve the polymerized bonds in the grease. The vinegar adds a fizzing action that lifts the grime away from the oven surface. This natural degreasing process is gentle yet powerful, and it won’t release harsh fumes into your kitchen.
Step 4: Scrub Away the Grease
After the solution has had time to work, put on your rubber gloves and start scrubbing. Use a scrub brush or non-abrasive sponge to work the paste in circular motions. The grime should come away fairly easily at this point. For stubborn spots, apply a little more paste and let it sit for another 10 minutes before scrubbing again.
For the oven door, use a damp cloth to wipe away the loosened grease. The glass surface responds well to the baking soda paste, and you’ll see the grime lift away quickly. If there are still tough stains on the oven door grease, try dipping a cloth in hot vinegar and placing it over the stain for a few minutes before scrubbing.
Step 5: Wipe Clean and Reassemble
Once you’ve scrubbed all the surfaces, wipe everything down with a clean, damp cloth. Remove all traces of the baking soda paste and dissolved grease. You may need to rinse the cloth several times to get a completely clean wipe. A final pass with a dry cloth prevents water spots and leaves the oven interior looking fresh.
Now take care of the oven racks. Scrub them with the same baking soda paste or use a scrub brush in the soapy water they’ve been soaking in. Rinse them thoroughly with clean water and dry them completely before sliding them back into the oven. Reassemble all components, and your oven is ready to use again.
Comparison: Which Cleaning Method Works Best?
Not all oven cleaning methods are created equal. Here’s a side-by-side look at the most popular approaches for oven grease cleaning so you can choose the one that fits your needs.
| Method | Effectiveness | Cost | Time Required | Best For |
|---|---|---|---|---|
| Baking Soda Paste | High | Very Low | 1-2 hours | Moderate to heavy caked-on grease |
| Vinegar and Steam | Medium-High | Very Low | 30-60 minutes | Light to moderate grease and odors |
| Commercial Oven Cleaner | Very High | Moderate | 20-40 minutes | Severely neglected ovens with burnt grease |
| Lemon and Hot Water | Medium | Low | 1-2 hours | Light grease and fresh odors |
| Self-Cleaning Cycle | High | Free (built-in) | 2-4 hours | Regular maintenance and light buildup |
Each method has its strengths. The baking soda paste is the most versatile and affordable option. It handles most grease levels without exposing your kitchen to harsh chemicals. Commercial cleaners work fastest but contain strong fumes that require good ventilation. The self-cleaning cycle is convenient but can produce smoke and odors during the high-heat process.
- Using steel wool or abrasive pads that scratch the oven interior
- Applying cleaning solutions directly to the heating elements
- Skipping the soaking step and trying to scrub dry grease
- Using too much water near the oven’s electrical components
- Not ventilating the room when using commercial cleaners
Natural Cleaning Solutions For Tough Grease
If you prefer to avoid commercial products, several natural solutions work wonders on caked-on grease in oven interiors. These methods use ingredients you probably already have in your pantry.
Baking Soda Paste Method
This is the gold standard for natural oven degreasing. Mix three tablespoons of baking soda with one tablespoon of water to form a spreadable paste. Apply it to all greasy surfaces, avoiding the heating elements. Let it sit for at least one hour, then scrub with a damp sponge. The alkaline nature of baking soda breaks down grease molecules naturally and safely.
For extra tough stains, make the paste thicker and let it sit overnight. The extended contact time gives the baking soda more opportunity to dissolve the hardened grease. This method is especially effective for ovens that haven’t been cleaned in a long time and have significant baked-on buildup.
Vinegar and Steam Cleaning
Steam cleaning is one of the most gentle yet effective approaches for oven grease removal. Boil a pot of water on the stove and add a cup of white vinegar. Place the pot inside the oven (on a safe surface) and close the door. Let the steam circulate for 15 to 20 minutes.
The steam softens the caked-on grease and loosens its grip on the oven surfaces. Afterward, remove the pot, let the oven cool slightly, and wipe everything down with a damp cloth. You’ll be surprised how much grease comes away with just a simple wipe. This method is perfect for regular maintenance and light to moderate grease buildup.
Lemon and Hot Water Trick
Lemon is a natural degreaser and deodorizer all in one. Squeeze the juice of two lemons into a baking dish filled with hot water. Place the dish in the oven and set the temperature to 200°F (93°C). Let it run for 30 minutes. The citric acid in the lemon breaks down grease while the steam lifts it away.
After the cycle, turn off the oven and let it cool enough to handle safely. Wipe the interior with a clean cloth. Your oven will smell fresh and citrusy instead of like last night’s dinner. This method is ideal for light grease and everyday maintenance.
Quick Tips for Better Results
- Always test a small hidden area first when using any new cleaning solution
- Warm your cleaning solution slightly for faster grease dissolution
- Use a toothbrush for hard-to-reach corners and crevices
- Clean your oven racks in a bathtub for easy access and less mess
- Reapply cleaning solution to the worst spots and let them soak longer
Preventing Grease Buildup For Good
Cleaning is easier when you prevent heavy buildup in the first place. A few simple habits can keep your oven grease level low and reduce how often you need to do a deep clean.
Use an Oven Liner
Oven liners are silicone or aluminum sheets that sit on the bottom of your oven beneath the rack. They catch drips and splatters before they reach the oven floor. After each cooking session, simply lift the liner, wipe it clean, and replace it. This one simple change prevents most of the food splatter that leads to caked-on grease.
Look for liners that are heat-resistant and fit your oven size properly. Avoid covering the heating elements with liners, as this can cause uneven heating or damage. A well-placed liner at the bottom of the oven is one of the best maintenance tips for keeping your oven clean.
Regular Maintenance Tips
- Wipe up spills immediately – the longer grease sits, the harder it bonds to surfaces
- Line the bottom with foil – catch drips before they reach the oven floor
- Run a steam clean monthly – a quick steam session prevents heavy buildup
- Cook with lids on – reduces splatter significantly
- Avoid overfilling pans – less spillage means less grease buildup
- Check the oven door seal – grease can accumulate on the gasket too
These small habits add up over time. An oven that receives regular light cleaning stays in much better shape than one that’s neglected until the grease becomes impossible to ignore. Prevention is always easier than cure, especially when it comes to oven grease cleaning.
When To Call A Professional Or Consider Replacement
Most grease problems can be solved with the methods described above. But there are situations where professional help makes sense. If your oven has heavy grease buildup that won’t respond to any home cleaning method, a professional oven cleaning service can handle the job. They have industrial-grade degreasers and specialized tools that cut through even the worst baked-on grime.
Also consider professional help if you notice damage to the oven interior. Deep grease burns can discolor or pit the oven walls. If the heating elements are covered in grease and not functioning properly, a professional can assess whether cleaning or replacement is needed. A greasy oven that doesn’t heat correctly is not just a cleaning problem – it’s a safety concern.
In rare cases, the cost of repeated professional cleaning may exceed the value of the oven. If your unit is old and the interior is permanently damaged or stained, it might be time to look at oven replacement options. A new energy-efficient oven can save you money on utility bills and eliminate the constant battle with grease buildup.
Conclusion
Knowing how to clean caked on grease in oven fast and easy puts you in control of your kitchen. You don’t need expensive products or specialized skills. With baking soda, vinegar, a little patience, and the right technique, you can restore your oven to a clean, fresh state. The key is to act before the grease becomes severely baked-on and to maintain a regular cleaning routine.
Start with the natural methods first. They’re safer, cheaper, and just as effective for most situations. Save commercial cleaners for the really tough jobs. And remember, prevention through oven liners and regular wiping is your best long-term strategy for keeping grease under control. Your oven works hard for you – give it the care it deserves with these simple cleaning habits.
Frequently Asked Questions
What is the fastest way to clean caked on grease in oven?
The fastest method is using a commercial oven cleaner spray followed by a steam clean cycle. Spray the product on the greasy surfaces, wait 10 minutes, then wipe clean. For a natural alternative, use a baking soda paste and let it sit for 30 minutes before scrubbing. Both methods deliver results in under an hour.
Can I use baking soda and vinegar together to clean my oven?
Absolutely. The combination of baking soda and vinegar creates a fizzing reaction that lifts and dissolves baked-on grease effectively. Apply baking soda paste first, then spray vinegar on top. Let it sit for 20 to 30 minutes before scrubbing and wiping clean. This natural oven cleaning solution works great for moderate grease buildup.
How often should I clean my oven to prevent grease buildup?
A light cleaning every month and a deep clean every 3 to 6 months keeps most ovens in great shape. If you cook frequently or use your oven for greasy foods, you may need to clean more often. Using oven liners and wiping spills immediately also reduces how often deep cleaning is needed.
Is it safe to clean the inside of a self-cleaning oven manually?
Yes, you can clean the interior manually even if your oven has a self-cleaning function. In fact, running the self-clean cycle first and then doing a manual wipe-down gives the best results. The self-clean cycle burns off loose grease, and the manual cleaning removes any remaining residue. Just avoid using abrasive tools on the interior surface.
What causes black grease buildup in ovens?
Black grease buildup is caused by the polymerization of cooking oils and fats at high temperatures. Over time, these fats bond together and form a hard, black coating on oven surfaces. Food splatter that isn’t cleaned promptly contributes to this buildup. Regular cleaning prevents the grease from reaching this hardened, discolored stage.
How do I remove oven door grease without scratching the glass?
Make a paste of baking soda and water, apply it to the greasy glass, and let it sit for 20 minutes. Gently scrub with a soft, damp cloth or non-abrasive sponge. For stubborn spots, place a warm wet cloth over the area for a few minutes to soften the grease before wiping. Never use steel wool or abrasive pads on oven glass.