Do You Cook Ribs Bone Up Or Down In The Oven Today
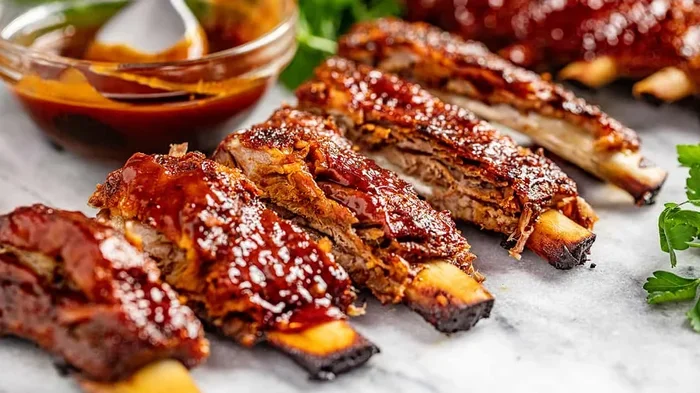
Do you cook ribs bone up or down in the oven? The answer depends on your goal. Placing ribs bone side down keeps meat moist and gets a great bark, while bone side up makes rinsing sauce easy. Most pitmasters recommend bone side down for oven baking. This guide walks you through every step so your oven baked ribs turn out tender, juicy, and full of flavor.
There is nothing quite like pulling a tray of oven baked ribs out of the kitchen. The smell fills the whole house. The meat is tender. The bark is crispy. But here is the question that trips up so many home cooks: do you cook ribs bone up or down in oven?
This simple question has sparked debates among barbecue lovers for years. Some people swear by one method. Others insist the opposite is better. The truth is, both ways work. But they give you different results. Bone side down is the most popular choice, and for good reason. It keeps the meat moist and helps build a beautiful crust. Bone side up has its own perks, especially when you are working with sauce. In this guide, we will walk you through everything you need to know. By the end, you will feel confident placing your rack of ribs in the oven the right way every single time.
Whether you are a beginner or a seasoned griller, understanding how rib bones affect cooking makes a big difference. The position of the bones changes how heat reaches the meat. It changes how fat renders. It even changes how your dry rub ribs develop flavor. Let us dive in and break it all down.
Key Takeaways
- Bone Side Down Is the Go-To: Most experts place ribs bone side down in the oven for even cooking and better moisture retention.
- Low and Slow Wins: Cooking ribs at 275°F to 300°F for 3 to 4 hours delivers the most tender results.
- The Bone Side Up Method Has Its Place: It works well if you want to baste or sauce easily without flipping.
- Foil Wrapping Helps: Wrapping ribs in foil partway through keeps them moist and speeds up the cook.
- A Rib Rack Saves Space: Using a rib rack in the oven allows air to flow around the meat evenly.
- Resting Matters: Letting ribs rest for 15 to 20 minutes after cooking locks in juices and improves texture.
📑 Table of Contents
- Do You Cook Ribs Bone Up Or Down In Oven
- Best Oven Temperature For Ribs
- How Long To Cook Ribs In The Oven
- The Foil Wrap Method Explained
- Common Mistakes When Cooking Ribs In The Oven
- Best Practices For Perfect Oven Ribs
- Bone Up Vs Bone Down: A Side By Side Comparison
- Final Thoughts On Cooking Ribs Bone Up Or Down
Do You Cook Ribs Bone Up Or Down In Oven
The short answer is bone side down for most oven cooking situations. When you place the ribs with the bones facing up, the meat sits closer to the bottom of the pan or tray. This means it gets more direct heat. The result is a firmer bark and more rendered fat. The bones also act as a natural rack, lifting the meat slightly off the pan. This allows hot air to circulate underneath.
When you flip it and place the ribs bone side up, the meat faces upward. This position is great if you plan to baste frequently or apply a sticky sauce in the last minutes of cooking. The bones shield the meat a bit from direct heat, which can slow things down slightly. Some people prefer this method because it is easier to add sauce without flipping the entire slab.
Why Bone Side Down Works So Well
Placing pork ribs bone side down has several clear advantages. First, the fat cap faces downward. As it renders, the fat drips away from the meat instead of pooling on top. This leads to a less greasy bite. Second, the meat sits directly on the baking surface. This creates more contact with heat, which builds a deeper, crunchier bark. Third, the bones prop the meat up just enough to let air flow beneath. This helps the ribs cook more evenly.
Most competition pitmasters and barbecue instructors teach the bone side down method. It is simple. It is effective. And it works with almost any type of oven rib recipe. If you are not sure which way to go, start with bone side down. You can always experiment with the other method once you master the basics.
When Bone Side Up Makes Sense
There are times when placing ribs bone side up is the better choice. If you are using a thin or watery sauce, bone side up keeps the meat facing upward. This makes it easy to brush on sauce without disturbing the bark. The sauce sticks to the top surface of the meat better when it faces up. Also, if you are cooking smaller cuts like rib tips or baby back rib sections, bone side up can help them cook more gently.
Another reason to go bone side up is if you are using a shallow pan. Placing the ribs bone side down in a shallow tray can cause the meat to stick or burn on the bottom. In this case, bone side up lifts the meat higher and protects it from direct contact with the hot pan surface.
Best Oven Temperature For Ribs
Temperature is just as important as bone placement. Cooking ribs at the right heat makes all the difference between tough, chewy meat and fall-off-the-bone tenderness.
The Low and Slow Approach
The gold standard for oven rib recipe cooking is low and slow. Set your oven to 275°F or 300°F. This gentle heat breaks down the collagen in the pork ribs slowly over time. The meat becomes tender without drying out. Most pork ribs need about 3 to 4 hours at this temperature. Baby back ribs usually take closer to 3 hours. St. Louis style ribs and spare ribs may need the full 4 hours or slightly more.
The low temperature also gives your dry rub ribs time to develop deep flavor. The sugars in the rub caramelize slowly. The spices penetrate the meat gradually. You end up with a rich, complex taste that is hard to achieve with high-heat cooking.
Higher Heat For Faster Cooking
If you are short on time, you can cook ribs at 350°F or even 375°F. This cuts the cooking time roughly in half. However, higher heat increases the risk of drying out the meat. You will need to wrap the ribs in foil partway through to trap moisture. This technique is sometimes called the “Texas crutch.” It works well for oven baked ribs when you want results faster but still want tender meat.
Quick Tips For Temperature Control
- Always preheat your oven before placing the ribs inside.
- Use an oven thermometer to check that your oven is accurate.
- Place the oven rack in the center position for even heat distribution.
- If your oven runs hot, reduce the temperature by 10 to 15 degrees.
- Avoid opening the oven door too often. It drops the temperature and slows the cook.
How Long To Cook Ribs In The Oven
Cooking time depends on the type of ribs, the temperature, and the thickness of the meat. Here is a general guide to help you plan your cook.
| Rib Type | Temperature | Approximate Cook Time | Bone Side Down or Up |
|---|---|---|---|
| Baby Back Ribs | 275°F | 2.5 to 3 hours | Bone side down |
| Spare Ribs | 275°F | 3.5 to 4 hours | Bone side down |
| St. Louis Style | 300°F | 3 to 3.5 hours | Bone side down |
| Rib Tips | 300°F | 1.5 to 2 hours | Either works |
| Baby Back (Fast Method) | 350°F | 1.5 to 2 hours | Bone side up (for saucing) |
These times are guidelines. The real test for doneness is the bend test. Pick up one end of the ribs with a pair of tongs. If the meat cracks slightly on the surface and the ribs bend easily, they are done. If they still feel stiff, give them another 30 minutes.
Using A Meat Thermometer
For the most accurate results, use a meat thermometer. Insert it into the thickest part of the meat, avoiding the bone. The internal temperature should reach about 195°F to 203°F. At this range, the collagen has fully broken down. The pork ribs will be juicy and tender. Some people pull their ribs at 185°F, but they may be slightly tougher. Patience pays off when cooking pork ribs in the oven.
The Foil Wrap Method Explained
Wrapping ribs in foil during the cook is one of the most effective tricks for tender oven baked ribs. This method is sometimes called the “Texas crutch.” It traps steam and moisture around the meat. This speeds up the breakdown of tough connective tissue.
When To Wrap
Most cooks wrap their ribs after about 2 hours of cooking. By this point, the bark has started to form. The surface is slightly dry. Wrapping at this stage adds moisture back into the meat without washing away the bark completely. Use a heavy-duty foil or a double layer of regular foil to prevent tears.
What To Add Inside The Foil
You can keep the wrap simple with just the ribs and foil. Or you can add a few extras for extra moisture and flavor. A splash of apple cider vinegar works wonders. A small amount of brown sugar rub or honey adds sweetness. Some cooks add a pat of butter or a few slices of onion. These extras create a steaming effect that makes the meat incredibly tender.
After wrapping, return the ribs to the oven for another 1 to 2 hours. Unwrap them during the last 30 minutes to let the bark firm back up. This gives you the best of both worlds: moist meat and a crispy exterior.
Expert Insight
Many competition cooks keep their wrapping method a closely guarded secret. But the basic principle is the same. Moisture equals tenderness. Whether you use foil, a disposable pan with a lid, or a beef wrapping paper, the goal is to trap steam. This is especially helpful for spare ribs and St. Louis style cuts, which have more connective tissue than baby backs.
Common Mistakes When Cooking Ribs In The Oven
Even experienced cooks make mistakes. Here are the most common ones and how to avoid them.
Cooking At Too High A Temperature
This is the number one mistake people make. Cranking the oven to 400°F or higher might seem like a shortcut. But high heat dries out the meat before the collagen has time to break down. The result is tough, chewy ribs that are brown on the outside but raw on the inside. Stick with low temperatures for the best oven rib recipe results.
Skipping The Resting Period
Once your ribs come out of the oven, resist the urge to cut into them right away. Let them rest for 15 to 20 minutes. This allows the juices to redistribute throughout the meat. If you cut too early, the juices run out and the ribs dry out. Tent them loosely with foil during the resting period.
Not Removing The Membrane
The thin membrane on the back of the rib bones is tough and chewy. It does not break down during cooking. Use a butter knife to loosen one corner, then grip it with a paper towel and peel it off. This simple step makes a huge difference in the texture of your pork ribs.
Over-Saucing Too Early
Sauces that contain sugar burn easily. If you apply your sauce too early in the cook, it will turn black and bitter. Wait until the last 15 to 30 minutes to add any sauce. Brush it on lightly and let it caramelize. This gives you a sweet, glossy finish without any burnt flavors.
Best Practices For Perfect Oven Ribs
Now that we have covered the basics, let us look at the best practices that separate good ribs from great ones.
Choose The Right Rack Position
Place the ribs on the middle oven rack. This ensures even heat exposure on all sides. If you are cooking multiple racks of ribs, use a rib rack. This metal stand holds the ribs upright and allows air to flow around them. It is a game changer for anyone who cooks ribs regularly.
Prep Your Ribs The Night Before
Applying your dry rub ribs mixture the night before gives the flavors time to penetrate deep into the meat. Cover the ribs with plastic wrap and refrigerate them overnight. By the time you cook them, the seasoning has already started working its magic. The result is more flavorful oven baked ribs with a deeper crust.
Let The Ribs Come To Room Temperature
Take the ribs out of the fridge about 30 minutes before cooking. Letting them sit at room temperature helps them cook more evenly. Cold meat placed directly into a hot oven cooks unevenly. The outside overcooks while the inside stays underdone.
Use A Pan With Liquid
Place a shallow pan of water, apple juice, or apple cider vinegar on the rack below the ribs. This adds moisture to the oven environment. It prevents the ribs from drying out during the long cook. It also makes cleanup easier by catching drips.
Know When To Stop Cooking
Overcooked ribs are just as bad as undercooked ones. The meat should pull back from the bone ends by about a quarter inch. The ribs should bend easily when lifted. The internal temperature should be between 195°F and 203°F. Trust these signs rather than the clock alone. Every oven is different, and the thickness of your rack of ribs can vary.
Quick Tips For Perfect Ribs Every Time
- Remove the membrane from the back of the ribs before seasoning.
- Apply a generous layer of brown sugar rub for a sweet, caramelized bark.
- Place the ribs bone side down for the first 2 hours of cooking.
- Wrap in foil after 2 hours with a splash of apple cider vinegar.
- Unwrap for the last 30 minutes to develop the bark.
- Rest the ribs for 15 to 20 minutes before slicing.
- Use a sharp knife or kitchen scissors to cut between the bones.
Bone Up Vs Bone Down: A Side By Side Comparison
Let us look at the two methods head to head so you can decide which works best for you.
| Factor | Bone Side Down | Bone Side Up |
|---|---|---|
| Moisture Retention | Excellent. Fat renders away from meat. | Good. Bones shield meat from direct heat. |
| Bark Development | Superior. More surface contact with heat. | Moderate. Meat is slightly insulated by bones. |
| Sauce Application | Requires flipping to sauce the bottom. | Easy. Sauce goes directly on the meat side. |
| Even Cooking | Very even. Bones act as a natural rack. | Good. Bones distribute heat gently. |
| Best For | Dry rub ribs and naked ribs. | Sauced ribs and quick cooks. |
| Ease Of Use | Simple and forgiving. | Simple but sauce can drip into bones. |
As you can see, bone side down has the edge for most situations. It gives you better bark, more even cooking, and excellent moisture retention. But if you love a heavily sauced rack of ribs, bone side up might be your preference. Try both methods and see which one you like better. There is no wrong answer when it comes to pork ribs.
Final Thoughts On Cooking Ribs Bone Up Or Down
The debate over whether to cook ribs bone up or down in the oven is one of the great food conversations. But the real secret is this: technique matters more than position. Low temperature, patience, proper seasoning, and knowing when the ribs are done will give you amazing results either way.
If you are just starting out, place your pork ribs bone side down and follow the low and slow method. Set your oven to 275°F or 300°F. Cook for 3 to 4 hours. Wrap in foil halfway through. Let them rest before serving. You will be amazed at how tender and flavorful your oven baked ribs turn out.
The beauty of cooking ribs at home is that you control every variable. You choose the rub. You pick the temperature. You decide when to sauce. Once you master the basics of bone placement and oven timing, you can experiment with different flavors and techniques. Try a brown sugar rub one weekend. Add apple cider vinegar to your foil wrap the next. Before long, you will be known as the go-to rib cook among your friends and family.
So the next time someone asks you, do you cook ribs bone up or down in oven, you will have a clear answer. And more importantly, you will know why. That confidence will show in every rack of ribs you serve. Happy cooking.
Frequently Asked Questions
Can I cook ribs bone up in the oven?
Yes, you absolutely can. Placing ribs bone side up works well if you plan to add sauce during the last part of cooking. The bones face upward and the meat sits on top, making it easy to brush on sauce without flipping. This method also shields the meat slightly from direct heat, which can prevent drying.
How long does it take to cook ribs in the oven at 275°F?
Baby back ribs typically take 2.5 to 3 hours at 275°F. Spare ribs and St. Louis style ribs may need 3.5 to 4 hours. The exact time depends on the thickness of the meat and your oven’s accuracy. Always use the bend test or a meat thermometer to check for doneness.
Should I remove the membrane from ribs before cooking?
Yes, you should. The membrane on the back of the rib bones is tough and chewy. It does not soften during cooking. Removing it allows better seasoning absorption and improves the texture of your finished ribs significantly. Use a paper towel to grip and peel it off easily.
What is the best dry rub for oven ribs?
A simple blend of brown sugar, paprika, garlic powder, onion powder, salt, and black pepper works wonderfully. You can also add chili powder, cumin, or cayenne for a little heat. Apply the rub generously and let it sit overnight in the fridge for the best flavor penetration.
Is it better to wrap ribs in foil or cook them uncovered?
Wrapping ribs in foil partway through the cook adds moisture and speeds up tenderizing. This is great for spare ribs and thicker cuts. Cooking uncovered the entire time gives a crisper bark but requires more attention to prevent drying. Many cooks use a combination of both methods for the best results.
Can I use a rib rack in the oven?
Absolutely. A rib rack holds the ribs upright and allows hot air to circulate around them evenly. This is especially helpful if you are cooking multiple racks at once. It also makes it easier to place the ribs bone side down without them rolling or shifting during the cook.
=== CONCLUSION ===
Do you cook ribs bone up or down in oven? The answer is clear. For most cooks, placing ribs bone side down produces the best results. You get a superior bark, even cooking, and excellent moisture retention. The bones act as a natural rack, and the fat renders away from the meat for a cleaner, more flavorful bite.
That said, bone side up has its place, especially when you are working with sauce or cooking smaller cuts like rib tips. The key is understanding why each method works and choosing the one that fits your goals.
Combine proper bone placement with the right temperature, patience, and a quality dry rub, and you will serve oven baked ribs that rival any barbecue joint. Keep practicing, keep experimenting, and most importantly, enjoy the process. Great ribs do not happen by accident. They happen by choice, and now you have all the knowledge to make the right choice every time.