How Long Chicken Breast in Oven 350 to Bake Perfect
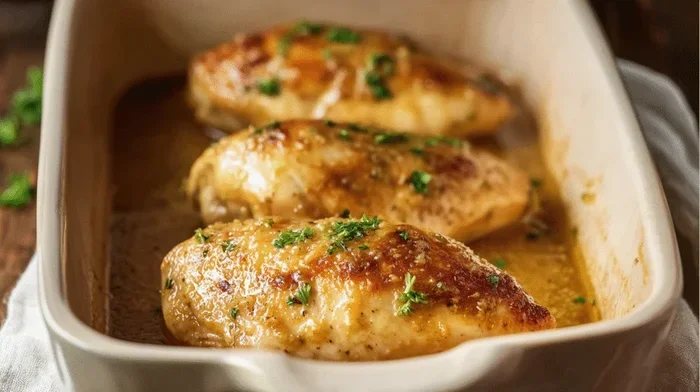
Baking chicken breast at 350°F is one of the easiest and most reliable ways to cook a tender, juicy meal at home. The standard baking time ranges from 20 to 30 minutes depending on thickness, whether the chicken is boneless or bone-in, and your desired level of doneness. Using a meat thermometer is the single best way to ensure your chicken reaches a safe internal temperature of 165°F without overcooking. This guide covers everything from timing and seasoning to storage and reheating for perfect results every time.
There is something deeply satisfying about pulling a perfectly baked chicken breast out of the oven. The aroma fills the kitchen, the outside turns golden brown, and the inside stays moist and tender. But here is the thing many home cooks struggle with: how long chicken breast in oven 350 actually takes to bake. Too short, and it is undercooked. Too long, and you end up with dry, rubbery meat that nobody wants to eat.
The good news is that baking chicken breast at 350 degrees Fahrenheit is one of the most forgiving cooking methods you can use. Once you understand the basic timing and a few simple variables, you will nail it every single time. This guide covers everything you need to know about baking chicken breast in the oven at 350°F, from timing and temperature to seasoning and storage.
Whether you are a beginner in the kitchen or someone looking to refine your technique, this article will walk you through each step with clear, practical advice. We will cover baking times, the factors that change those times, and pro tips that make a real difference. By the end, you will feel confident enough to bake perfect chicken breast every time without guessing or stressing.
Key Takeaways
- Standard Bake Time: Boneless chicken breast at 350°F typically takes 20 to 25 minutes, while bone-in pieces may need 30 to 40 minutes.
- Thickness Matters Most: Thicker cuts need more time, so always check with a meat thermometer for accuracy and food safety.
- Resting Is Essential: Letting chicken rest for 5 to 10 minutes after baking keeps juices locked in and meat tender.
- Seasoning Makes a Big Difference: Simple herbs, olive oil, garlic, and salt create flavorful, crispy results every time.
- Avoid Overcooking: Overcooked chicken breast becomes dry and tough, so monitor closely and pull it out at 165°F.
- Always Preheat Your Oven: Preheating to 350°F before placing chicken inside ensures even cooking from the start.
📑 Table of Contents
How Long to Bake Chicken Breast at 350°F
The most common question people ask is simply, “How long does chicken breast take in the oven at 350?” The answer depends on a few key factors, but here is a general guideline to get you started. Chicken breast baking time at 350°F varies based on the cut, thickness, and whether the meat is frozen or fresh.
Boneless Chicken Breast Baking Time
For a standard boneless, skinless chicken breast that is about 1 inch thick, expect a bake time of 20 to 25 minutes at 350°F. If your chicken breast is thinner, closer to half an inch, it may be done in as little as 15 to 18 minutes. Thicker cuts, say 1.5 inches or more, could take 25 to 30 minutes.
The key is to always check the internal temperature. The USDA recommends that chicken reaches an internal temperature of 165°F (74°C) for safe eating. A quick-read meat thermometer inserted into the thickest part of the breast gives you the most accurate result. Without a thermometer, you can cut into the thickest part and check that the meat is white throughout with no pink remaining.
Boneless chicken breast tends to cook faster and more evenly than bone-in pieces. This makes it ideal for weeknight dinners when you need something quick and reliable. A simple seasoning of olive oil, salt, pepper, and garlic powder is all you need for a delicious result.
Bone-In Chicken Breast Baking Time
If you are working with bone-in chicken breast, the baking time increases. Bone-in pieces typically need 30 to 40 minutes at 350°F. The bone slows down heat transfer to the meat, so it takes longer for the center to reach the safe temperature.
Bone-in chicken breast also tends to stay juicier because the bone helps retain moisture during the baking process. This makes it a great choice if you want a more flavorful and tender result. Just be patient and give it the extra time it needs. The chicken breast cooking time for bone-in pieces is always longer, but the extra flavor is well worth the wait.
Frozen Chicken Breast: What You Need to Know
Baking frozen chicken breast is possible, but it requires more time. A frozen boneless chicken breast at 350°F will need roughly 40 to 50 minutes to cook through. The baking time is significantly longer because the meat has to thaw and cook simultaneously.
Always make sure frozen chicken reaches an internal temperature of 165°F before serving. It is also a good idea to season frozen chicken before baking, as the longer cook time allows the flavors to penetrate more deeply into the meat. If you are in a rush, you can also thaw the chicken overnight in the refrigerator for a more predictable oven-baked chicken result.
Factors That Affect Chicken Breast Baking Time
Not all chicken breasts are created equal. Several variables can change how long it takes to bake chicken breast in oven 350. Understanding these factors helps you adjust your cooking time and avoid common mistakes.
Thickness of the Chicken Breast
This is the single biggest factor that affects baking time. A thin chicken breast cooks much faster than a thick one. If you have uneven thickness, consider pounding the thicker parts to create an even surface. This ensures uniform cooking and prevents the thinner edges from drying out while the center is still raw.
A good trick is to place the chicken breast between two sheets of plastic wrap and gently pound it with a meat mallet or rolling pin. This simple step can reduce your chicken breast baking time by several minutes and promote more even doneness throughout the piece.
Starting Temperature of the Chicken
Chicken that comes straight from the refrigerator will take longer to bake than chicken that has been brought to room temperature. Taking your chicken breast out about 15 to 20 minutes before baking can reduce cooking time slightly and promote more even cooking throughout.
Do not leave chicken at room temperature for more than 30 minutes, though, as this can create a food safety risk. The goal is simply to take the extreme chill off so the meat cooks more evenly from edge to center.
Oven Accuracy and Hot Spots
Not all ovens heat evenly. Some ovens run hotter than their settings suggest, while others have hot spots that can cause uneven cooking. If you are unsure about your oven’s accuracy, consider using an oven thermometer to verify the actual temperature inside.
Knowing your oven’s true oven temperature can make a surprising difference in your results. An oven that runs 25 degrees hot will cook your chicken faster than expected, potentially leading to dry meat if you are not paying attention.
Whether You Use Foil or Not
Covering chicken breast with aluminum foil traps moisture and slows down the cooking process slightly. This can be useful for thicker cuts that need more time without drying out on the outside. Leaving the chicken uncovered, on the other hand, promotes a golden, slightly crispy exterior.
The foil vs no foil debate is a common one among home cooks. If you prefer a crispy skin or a browned exterior, bake uncovered. If you want maximum moisture and a softer texture, cover with foil for the first half of the baking time, then remove it for the remaining time to let the outside crisp up.
Step-by-Step Guide to Baking Chicken Breast at 350°F
Now that you know the timing and factors involved, let us walk through the actual process of baking chicken breast in the oven. Follow these steps for consistent, delicious results every time.
Step 1: Preheat Your Oven
Always start by preheating your oven to 350°F. This is a crucial step that many people skip. Preheating ensures the oven reaches the target temperature before the chicken goes in, which leads to more even and predictable cooking. Give your oven at least 10 to 15 minutes to reach the right temperature before placing the chicken inside.
A properly preheated oven is the foundation of great oven-baked chicken breast. Skipping this step can lead to uneven cooking, longer bake times, and disappointing results.
Step 2: Prepare the Chicken Breast
Remove the chicken breast from the refrigerator and let it sit at room temperature for about 15 minutes. Pat it dry with paper towels. Dry chicken skin or surface browns better and crisps up more during baking. If the chicken is very thick, use a sharp knife to butterfly it or pound it to an even thickness of about 1 inch.
Butterflying a thick breast means slicing horizontally through the middle without cutting all the way through, then opening it like a book. This technique reduces the overall thickness and promotes even cooking throughout the piece.
Step 3: Season Generously
Seasoning is where you can get creative. A simple blend of olive oil, salt, black pepper, garlic powder, and paprika works beautifully for everyday chicken breast. You can also add dried herbs like thyme, rosemary, or oregano for extra flavor. Drizzle the olive oil over the chicken first, then sprinkle your seasonings evenly on both sides.
For a lemon herb flavor, try adding fresh rosemary, thyme, and a squeeze of lemon juice over the top. If you prefer a bit of heat, add cayenne pepper or chili powder. The best chicken breast seasoning is the one you enjoy most, so feel free to experiment with different combinations.
Step 4: Place on a Baking Sheet
Line a baking sheet with parchment paper or lightly grease it with cooking spray. Place the chicken breast in the center of the sheet, leaving space between pieces if you are baking multiple breasts. This allows hot air to circulate freely around each piece for even baking chicken in oven results.
A rimmed baking sheet works best because it catches any juices or drips. If you do not have a baking sheet, a baking dish or oven-safe skillet also works well for this recipe.
Step 5: Bake and Monitor
Place the baking sheet on the middle rack of your oven. Set a timer for the recommended time based on the thickness of your chicken. For boneless breasts at 1 inch thick, start checking at the 20-minute mark. Use a meat thermometer to check the internal temperature in the thickest part. Once it reads 165°F, the chicken is done.
Do not rely solely on the timer. Every oven is different, and the thickness of your chicken can vary. Checking early and often prevents overcooking and ensures the best possible texture.
Step 6: Rest Before Serving
This step is easy to skip but makes a huge difference. Remove the chicken from the oven and let it rest on the baking sheet for 5 to 10 minutes. During resting, the juices redistribute throughout the meat, making each slice more tender and flavorful. Cutting into chicken immediately after baking causes those juices to run out, leaving you with drier meat.
Resting chicken after baking is just as important as the baking itself. Think of it as the final step that locks in all your hard work. A few minutes of patience here pays off in juicier, more flavorful results.
Tips for Juicy and Flavorful Oven-Baked Chicken Breast
Baking chicken breast perfectly is an art that anyone can master with a few simple techniques. These cooking tips for chicken breast will help you get restaurant-quality results at home.
Brine for Extra Juiciness
Brining is one of the best-kept secrets for juicy chicken breast. A simple brine of 4 cups of water, 1/4 cup of salt, and 2 tablespoons of sugar works wonders. Soak the chicken breast in the brine for 30 minutes to 2 hours before baking. The salt helps the meat retain moisture during cooking, resulting in a tender and juicy chicken breast every time.
If you do not have time for a full brine, even a quick 15-minute soak in salted water can make a noticeable difference. The salt penetrates the surface and helps the muscle fibers hold onto more moisture during the baking process.
Use a Wire Rack for Better Crispiness
Instead of placing chicken directly on a baking sheet, try using a wire rack set over the sheet. Elevating the chicken allows hot air to flow underneath, creating a more evenly crispy surface. This method works especially well if you like a slightly crunchy exterior on your oven-baked chicken breast.
A wire rack also prevents the bottom of the chicken from sitting in its own juices, which can make it soggy. This small upgrade is inexpensive and makes a big difference in texture.
Add a Pan Sauce After Baking
Once your chicken is rested, you can use the juices left on the baking sheet to make a quick pan sauce. Simply add a splash of chicken broth, a squeeze of lemon juice, and a knob of butter to the hot pan. Stir for a minute or two, then drizzle over your sliced chicken. This adds moisture and a burst of flavor that takes your dish to the next level.
A simple pan sauce transforms basic baked chicken into something that feels special and restaurant-worthy. It is an easy chicken breast recipe upgrade that takes only a couple of extra minutes.
Make Ahead and Meal Prep
Baked chicken breast is one of the best proteins for meal prep. You can bake several breasts at once, let them cool, and store them in the refrigerator for up to 4 days. Sliced chicken breast works wonderfully in salads, wraps, sandwiches, and grain bowls throughout the week.
For variety, try different seasoning blends on different batches. One day you might go with a spicy Southwest flavor, and the next day a classic Italian herb blend. This keeps your meals exciting without adding extra cooking time.
Common Mistakes to Avoid When Baking Chicken Breast
Even experienced cooks sometimes make mistakes that lead to less-than-perfect results. Here are the most common pitfalls and how to avoid them.
Skipping the Meat Thermometer
Guessing whether chicken is done by its color or texture is unreliable. The only foolproof way to know your chicken is fully cooked is to use a meat thermometer. Invest in a good instant-read thermometer and make it a habit to check the temperature every time. This single tool will transform your chicken breast doneness confidence forever.
Overcooking the Chicken
Overcooking is the number one enemy of juicy chicken breast. Even a few extra minutes in the oven can turn a tender breast into a dry, tough piece of meat. Set your timer, check early, and pull the chicken out as soon as it hits 165°F. The chicken will continue to cook slightly as it rests, so removing it a few degrees early is perfectly fine.
Remember that carryover cooking means the internal temperature will rise by 3 to 5 degrees after you take the chicken out of the oven. This is why many experienced cooks pull the chicken at 160°F and let it rest to reach the safe 165°F.
Not Letting the Chicken Rest
Cutting into chicken immediately after it comes out of the oven releases all those delicious juices onto the cutting board instead of staying in the meat. Give your chicken the time it needs to rest. Five to ten minutes is all it takes to make a noticeable difference in moisture and tenderness.
Overcrowding the Baking Sheet
Crowding the pan blocks airflow and leads to uneven cooking. If you are baking multiple chicken breasts, use two baking sheets or arrange them with enough space between each piece. This small change makes a big difference in how evenly and how well your chicken bakes.
How to Know When Chicken Breast Is Done
Knowing when your chicken is fully cooked is the most important part of the entire process. Undercooked chicken is a food safety risk, while overcooked chicken is simply unpleasant to eat. Here is how to tell with confidence.
The most reliable method is the meat thermometer test. Insert the probe into the thickest part of the breast, avoiding bone if present. When the reading shows 165°F, your chicken is safe to eat. This is the standard set by the USDA and is trusted by professional chefs and home cooks alike.
There are a few visual and tactile cues you can also use, though they are less precise. Properly baked chicken breast will appear white throughout with no pink remaining near the bone or center. The juices should run clear when you pierce the thickest part. The meat should feel firm but still have some give when pressed gently with your finger.
Another helpful technique is the shrink test. As chicken cooks, it shrinks and pulls away from the bone (if bone-in) or the edges firm up noticeably (if boneless). While not as accurate as a thermometer, this can give you a general sense of progress, especially when combined with timing guidelines.
By combining these methods, you will build confidence in knowing exactly when your oven-baked chicken breast is ready. With practice, you will be able to judge doneness almost instinctively, making every batch better than the last.
Frequently Asked Questions
Can I bake chicken breast at 400°F instead of 350°F?
Yes, you can. Baking at 400°F reduces the cooking time, typically bringing it down to 15 to 22 minutes for boneless breasts. The higher temperature also promotes a crispier exterior. However, you need to watch it more closely to prevent overcooking, as the faster cook time leaves less margin for error.
Should I cover chicken breast with foil when baking?
Covering with foil traps moisture and keeps the chicken juicier, especially for thicker cuts. However, it also prevents the outside from crisping up. If you prefer a golden, slightly crispy skin, bake the chicken uncovered. For extra-tender results, cover it with foil for the first half of the baking time, then remove the foil for the remaining time.
How can I tell if chicken breast is undercooked?
The most reliable sign is an internal temperature below 165°F when checked with a meat thermometer. Visually, undercooked chicken may appear pink in the thickest area, and the juices may have a slightly reddish or pinkish tint. Always use a thermometer for the most accurate assessment of chicken breast doneness.
Can I bake chicken breast with skin on at 350°F?
Absolutely. Baking chicken breast with the skin on adds flavor and helps retain moisture during cooking. The skin also becomes crispy and delicious at 350°F. Just make sure the internal temperature reaches 165°F in the thickest part, and allow a few extra minutes compared to boneless, skinless chicken if the skin adds thickness.
What is the best seasoning for baked chicken breast?
A classic blend of olive oil, garlic powder, onion powder, smoked paprika, salt, and black pepper works wonderfully. For a lemon herb flavor, add fresh rosemary, thyme, and a squeeze of lemon juice. If you prefer a bit of heat, try adding cayenne pepper or chili powder. The best chicken breast seasoning is the one you enjoy most, so feel free to experiment.
How long can I store baked chicken breast in the fridge?
Cooked chicken breast stays fresh in the refrigerator for up to 4 days when stored in an airtight container. For longer storage, you can freeze baked chicken breast for up to 3 months. Make sure to wrap it tightly in plastic wrap or aluminum foil, then place it in a freezer-safe bag to prevent freezer burn and maintain quality.
Conclusion
Baking chicken breast at 350°F is one of the simplest and most satisfying ways to prepare a healthy, delicious meal at home. The key to success lies in understanding the baking time, accounting for variables like thickness and starting temperature, and using a meat thermometer to check for doneness. With the tips and techniques shared in this guide, you now have everything you need to bake perfect chicken breast every single time.
Remember to let your chicken rest after baking, season it generously, and avoid the common mistakes that lead to dry, overcooked meat. Whether you are meal prepping for the week, cooking for your family, or just looking for a quick and healthy dinner, oven-baked chicken breast at 350°F is a reliable and versatile choice that never disappoints.
Start with the timing guidelines provided here, adjust based on your specific cut and oven, and trust the process. Soon enough, baking chicken breast in the oven will become second nature to you. Happy cooking, and enjoy every bite of that perfectly baked chicken breast.