How To Heat Tostada Shells In Oven Perfectly Every Time
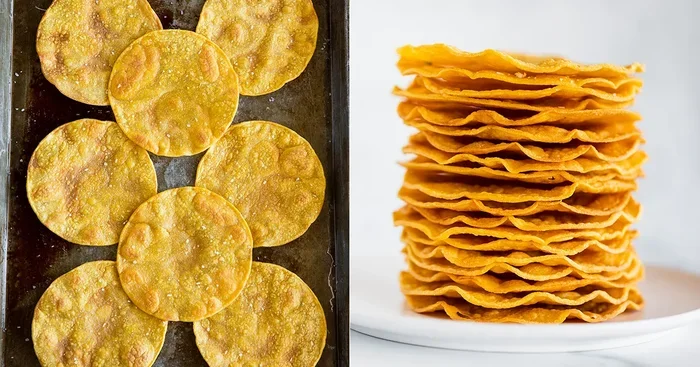
Heating tostada shells in the oven is the easiest way to get them crispy and delicious. This guide shows you the exact temperature, timing, and techniques to heat tostada shells in oven perfectly. You will learn how to avoid soggy shells and enjoy crunchy oven-baked tostadas every single time.
There is nothing quite like a crunchy tostada loaded with fresh toppings. But here is the thing. If your shell is not crispy, the whole experience falls flat. Many people wonder how to heat tostada shells in oven the right way. The good news is that it is simpler than you think. With just a few minutes and the right temperature, you can turn plain shells into crispy tostada shells that taste amazing. This guide walks you through every step. You will learn the best oven temperature, timing tips, and common mistakes to avoid. By the end, you will know exactly how to bake tostada shells like a pro.
Whether you are using store-bought tostadas or homemade tortilla shells, the method stays the same. The oven gives you even heat and that perfect crunch. No more limp, soggy shells. Let us dive into everything you need to know about heating tostada shells in oven perfectly.
Key Takeaways
- Use 350°F to 375°F: This is the sweet spot for heating tostada shells in oven without burning them.
- Preheat your oven first: Always let the oven reach the right temperature before placing shells inside.
- Watch them closely: Most tostada shells only need 5 to 10 minutes to heat through and turn crispy.
- Avoid the microwave: The microwave makes shells soggy, while the oven delivers that satisfying crunch.
- Line your baking sheet: Using foil or parchment paper makes cleanup easy and prevents sticking.
- Store leftover shells properly: Keep them in an airtight container to maintain their crunch for days.
📑 Table of Contents
- Why Heating Tostada Shells in the Oven Is the Best Method
- What You Need Before You Start
- Step-by-Step Guide to Heating Tostada Shells
- How to Make Tostada Shells Extra Crispy
- Common Mistakes to Avoid When Heating Tostada Shells
- Comparison: Different Methods for Heating Tostada Shells
- Creative Tostada Recipes to Try
- How to Store and Reheat Leftover Tostada Shells
- Expert Insights on Perfect Tostada Shells
- Frequently Asked Questions
- Conclusion
Why Heating Tostada Shells in the Oven Is the Best Method
You might be tempted to use the microwave. It is fast and easy. But the microwave does not work well for tostada shells. It adds steam. Steam makes shells soft and chewy. That is the opposite of what you want. The oven uses dry heat. Dry heat removes moisture and creates that satisfying snap.
Here is why the oven method wins every time:
- Even heat distribution: The oven warms shells from all sides at once.
- Better texture: You get a consistent crunch from edge to center.
- No soggy spots: Unlike microwaves, ovens do not create hot and cold zones.
- Works with any shell type: Corn, flour, baked, or fried tostadas all work great.
- Hands-off cooking: You can prep your toppings while the shells heat up.
Using the oven for your tostada recipe is a small change that makes a big difference. Once you try it, you will never go back to the microwave.
The Science Behind Crispy Tostada Shells
When you heat a tostada shell, something interesting happens. The moisture inside the shell evaporates. As it escapes, the starch in the tortilla becomes rigid. This is what gives you that crispy texture. The oven does this job perfectly because the air is dry and hot. The higher the dry heat, the crispier the result.
This is also why store-bought tostadas sometimes taste different from fresh ones. Pre-made shells have already lost some moisture during packaging. Reheating them in the oven brings back the crunch by driving out any remaining dampness. It is a simple process, but it makes a huge impact on your final dish.
What You Need Before You Start
Before you start heating tostada shells in oven, gather your supplies. You do not need much. The simplicity of this process is part of what makes it so great. Here is your checklist.
Essential Tools and Ingredients
- Tostada shells: Store-bought or homemade tortilla shells work great.
- Baking sheet: A standard flat sheet pan works perfectly.
- Parchment paper or aluminum foil: This prevents sticking and makes cleanup easy.
- Oven mitts: You will be handling a hot baking sheet.
- Tongs or spatula: Helpful for flipping shells halfway through.
- Oven thermometer (optional): Ensures your oven is at the right temperature.
As for toppings, the classic tostada toppings include refried beans, shredded cheese, seasoned ground beef, lettuce, salsa, and guacamole. You can use whatever you like. The beauty of a tostada is that you customize it to your taste.
Choosing the Right Tostada Shells
Not all tostada shells are created equal. Some are thicker and sturdier. Others are thin and delicate. Thick shells hold up well to heavy toppings like refried beans and shredded cheese. Thin shells are great for lighter toppings like salsa and lettuce. If you are buying store-bought tostadas, look for shells that are already firm and dry. Avoid any that feel soft or have broken edges. They will not crisp up well in the oven.
If you make homemade tostada shells, you have even more control over thickness and texture. Homemade shells often taste better because you can season them with a little salt, garlic powder, or lime juice before baking. Either way, the heating process is the same.
Step-by-Step Guide to Heating Tostada Shells
Now for the part you have been waiting for. Here is the exact process for how to heat tostada shells in oven. Follow these steps and you will get perfect results every time.
Step 1: Preheat Your Oven
Start by turning your oven on. Set the temperature to 350°F or 375°F. Both temperatures work well. 350°F gives you a gentler, slower crisp. 375°F gives you a faster, crunchier result. I recommend 350°F for beginners because it is more forgiving.
Let the oven preheat fully. This usually takes about 10 to 15 minutes. Do not skip this step. Putting shells in a cold oven leads to uneven heating and soft spots.
Step 2: Prepare Your Baking Sheet
While the oven heats up, line your baking sheet with parchment paper or aluminum foil. This is an easy cleanup trick that saves time. You can also lightly brush the paper with a thin layer of oil. This adds extra crispiness to the edges of the shells.
Step 3: Arrange the Shells on the Sheet
Place the tostada shells flat on the baking sheet. Leave space between each shell. You want air to flow around them. Crowding the pan traps steam and prevents proper crisping.
If you are heating a large batch, use two baking sheets or work in two rounds. It is tempting to fit as many shells as possible on one sheet. Resist that urge. A little patience goes a long way.
Step 4: Heat for 5 to 10 Minutes
Place the baking sheet on the middle rack of your oven. Set a timer for 5 minutes. After 5 minutes, check the shells. They should look slightly more golden and feel firmer to the touch.
For extra crispiness, continue heating for another 3 to 5 minutes. Total time usually falls between 5 and 10 minutes. Keep an eye on them. Every oven is different, and shells can go from perfectly crispy to burnt quickly.
Step 5: Cool and Top
Remove the baking sheet from the oven using oven mitts. Let the shells cool for 1 to 2 minutes. They will firm up as they cool. If you top them while they are too hot, the warm toppings can soften the shell slightly. A brief cooling period helps maintain that crunch.
Now comes the fun part. Load up your crispy tostada shells with your favorite toppings. Start with a layer of refried beans, add shredded cheese, then your protein of choice. Finish with fresh salsa, guacamole, lettuce, and a squeeze of lime.
How to Make Tostada Shells Extra Crispy
Sometimes regular heating is not enough. You want maximum crunch. Here are some pro tips to take your oven-baked tostadas to the next level.
Lightly Brush with Oil
Before heating, use a pastry brush to coat each shell with a thin layer of vegetable oil or olive oil. The oil helps conduct heat more evenly and adds a golden, fried-like texture. Use just a small amount. Too much oil makes the shells greasy instead of crispy.
Spray with Cooking Spray
If you do not want to use a brush, cooking spray works great. A light mist on both sides of the shell before baking adds crunch without excess oil. This is a quick and easy trick that makes a noticeable difference.
Use a Wire Rack Instead of a Baking Sheet
This is an advanced tip that elevates your results. Place a wire rack on top of your baking sheet and arrange the shells on the rack. Air circulates underneath the shells, crisping them evenly on both sides. This method mimics the results of deep frying without the extra oil or mess.
Add Salt Right After Heating
While the shells are still warm, sprinkle a little salt on top. The heat helps the salt stick and enhances the flavor. You can also add garlic powder, chili powder, or a squeeze of lime juice for extra flavor. These small additions make your tortilla shells taste restaurant-quality.
Quick Tips for Perfect Crispy Shells
- Do not stack shells after heating. Stacking traps steam and softens them quickly.
- Warm shells just before serving. Tostadas are best eaten within 10 minutes of heating.
- Keep shells at room temperature before baking. Cold shells from the pantry heat more evenly than fridge-cold ones.
- Flip shells halfway through. This ensures both sides get equally crispy.
- Use fresh shells when possible. Older shells that have been open for a while may need slightly longer to crisp up.
Common Mistakes to Avoid When Heating Tostada Shells
Even though this process is simple, there are a few mistakes that can ruin your results. Here is what to watch out for.
Using the Microwave
This is the number one mistake people make. The microwave heats tostada shells using steam. Steam softens the shell and makes it chewy. You lose all the crunch. Always use the oven for the best texture. If you are in a real hurry and must use the microwave, place a paper towel under and over the shell to absorb some moisture. But honestly, the oven method only takes a few extra minutes.
Skipping the Preheat
Putting shells in a cold oven means they heat slowly and unevenly. The shell absorbs moisture instead of losing it. Always preheat to your target temperature first. This small step makes a big difference in the final result.
Overcrowding the Pan
When shells are too close together, steam gets trapped between them. The result is soft, unevenly heated shells. Give each shell its own space on the baking sheet. If you need to bake a large batch, do it in two rounds.
Heating for Too Long
It is easy to forget about shells in the oven. Before you know it, they are burnt and bitter. Set a timer and check them at the 5-minute mark. Most shells need only 5 to 10 minutes total. Watch them closely and pull them out as soon as they look golden and feel firm.
Not Letting Shells Cool Before Topping
Hot shells are fragile. If you pile on heavy toppings like beans and cheese right away, the shell might break. Let them cool for a minute or two. The shell firms up and becomes sturdier. It also holds toppings better when it is not super hot.
Comparison: Different Methods for Heating Tostada Shells
Not sure which method is best? Here is a quick comparison of the most common ways to heat tostada shells.
| Method | Crispiness | Time | Ease | Best For |
|---|---|---|---|---|
| Oven | Excellent | 5-10 min | Easy | Best overall crunch and even heating |
| Microwave | Poor | 30-60 sec | Very easy | Quick reheat when crunch is not a priority |
| Air Fryer | Excellent | 3-5 min | Easy | Small batches with fast, even crisping |
| Stovetop | Good | 1-2 min per side | Moderate | Quick single-shell heating |
| Deep Fryer | Best | 2-3 min | Harder | Restaurant-style crispy shells |
As you can see, the oven strikes the best balance between results and effort. The air fryer is a close second if you own one. But for most people, the oven method is the easiest and most reliable way to heat tostada shells in oven perfectly.
Creative Tostada Recipes to Try
Now that you know how to heat your shells perfectly, it is time to get creative. Here are a few delicious tostada recipes you can try at home.
Classic Bean and Cheese Tostada
This is the go-to tostada for a reason. Spread a layer of warm refried beans on a heated shell. Top with shredded cheddar or Monterey Jack cheese. Add a little salsa and some fresh cilantro. It is simple, satisfying, and ready in minutes.
Chicken Tostada Supreme
Use shredded seasoned chicken as your base. Add black beans, corn, diced tomatoes, and a generous handful of shredded cheese. Top with guacamole, sour cream, and a drizzle of hot sauce. This is a hearty meal that the whole family will love.
Fish Tostada with Lime Crema
For something a little more upscale, try a fish tostada. Use crispy baked or fried fish fillets. Add shredded cabbage, pickled red onion, and a lime crema made from sour cream and fresh lime juice. This tostada tastes like it came from a coastal restaurant.
Veggie Tostada Bowl
Not a meat eater? No problem. Load your heated shell with roasted vegetables like bell peppers, zucchini, and onions. Add black beans, corn, avocado slices, and a squeeze of lime. This tostada is colorful, nutritious, and full of flavor.
How to Store and Reheat Leftover Tostada Shells
Did you make too many shells? No problem. You can store them and reheat them later. Proper storage keeps your shells crunchy for days.
Let the shells cool completely to room temperature. Place them in an airtight container or a zip-lock bag. Store them in a cool, dry place. Do not refrigerate them. The fridge adds moisture, which softens the shells. Keep them at room temperature, and they will stay crispy for up to a week.
When you are ready to eat again, simply heat tostada shells in oven at 350°F for 3 to 5 minutes. They will be almost as crispy as the first time. If you notice they are starting to lose their crunch, a quick spritz of oil before reheating works wonders.
Expert Insights on Perfect Tostada Shells
According to experienced Mexican cooks, the key to great tostadas starts with the tortilla itself. Use high-quality corn or flour tortillas. Corn tortillas give you a more authentic flavor and a sturdier base. Flour tortillas are softer and more flexible, which some people prefer.
Another expert tip is to double-bake your shells if you are making them from scratch. Bake them once at a low temperature to dry them out, then increase the heat to crisp them up. This two-step process creates shells that are incredibly durable and hold heavy toppings without breaking.
For store-bought shells, experts recommend checking the package date. Fresher shells crisp up much better than ones that have been sitting on the shelf for weeks. If your shells seem a bit stale but are not expired, the oven method can still rescue them and bring back their crunch.
Frequently Asked Questions
Can I heat tostada shells in the oven without parchment paper?
Yes, you can. You can use aluminum foil or just place the shells directly on the baking sheet. Parchment paper makes cleanup easier and prevents sticking, but it is not required. If you use foil, the shells may not get quite as crispy on the bottom, but they will still heat through fine.
How long do heated tostada shells stay crispy?
Tostada shells stay their crunchiest for about 10 to 15 minutes after heating. After that, the moisture from toppings and the air starts to soften them. This is why it is best to heat shells right before serving. If you need to prepare ahead, keep shells separate from toppings and combine them just before eating.
Can I use flour tortillas to make tostada shells in the oven?
Absolutely. Flour tortillas can be used to make tostada shells. Simply cut them into triangles or rounds, brush lightly with oil, and bake at 350°F for 8 to 12 minutes until crispy. Flour tortilla shells are softer than corn shells but still delicious and sturdy enough for most toppings.
What is the best temperature to heat tostada shells in the oven?
The best temperature is between 350°F and 375°F. 350°F is more forgiving and produces a gentle, even crisp. 375°F is faster and gives a slightly more aggressive crunch. Either temperature works well, so choose based on your preference and how much time you have.
Can I heat tostada shells in the oven from frozen?
Yes, you can. Frozen tostada shells can go straight into the oven. Add 2 to 3 extra minutes to the heating time. Check them at the 7-minute mark and adjust as needed. Make sure the shells are heated all the way through before adding toppings.
Why do my tostada shells keep breaking when I add toppings?
Shells break for a few reasons. They might not be heated long enough and are still too brittle. They might be too thin for heavy toppings. Or they might have been stacked and trapped moisture, softening them. Make sure your shells are properly heated, use sturdy shells for heavy toppings, and store them properly to keep them dry and firm.
Conclusion
Learning how to heat tostada shells in oven is one of the easiest kitchen skills you can master. It takes just a few minutes and delivers restaurant-quality crunch every time. The oven method beats the microwave by a mile. It gives you even heat, better texture, and that satisfying snap everyone loves.
Remember to preheat your oven to 350°F or 375°F, line your baking sheet, and give your shells enough space. Watch them closely and pull them out when they look golden. Use our tips to make them extra crispy, avoid the common mistakes, and try out the creative recipes we shared.
Whether you are making a quick weeknight dinner or hosting a taco night with friends, perfectly heated tostada shells are the foundation of a great meal. Your oven-baked tostadas will taste better, crunch more, and impress everyone at the table. So next time you reach for those tostada shells, skip the microwave and let the oven do its magic. You will be glad you did.