How Do You Cook Pumpkin Seeds In The Oven Perfectly
Cooking pumpkin seeds in the oven is one of the easiest and most rewarding kitchen skills you can learn. Whether you want salted, seasoned, or sweet pumpkin seeds, the oven method gives you perfect results every time. This guide walks you through cleaning, seasoning, and baking pumpkin seeds with simple steps anyone can follow. You will learn the ideal temperature, timing, and pro tips for the crunchiest pumpkin seeds ever. Get ready to turn your leftover pumpkin guts into a delicious, healthy snack!
There is something deeply satisfying about turning the inside of a pumpkin into a crunchy, savory snack. If you have ever carved a pumpkin and tossed the slimy guts away, you have been missing out on one of the simplest treats you can make. How do you cook pumpkin seeds in the oven? The answer is easier than you think, and the results are absolutely worth the effort.
Baking pumpkin seeds in the oven is a timeless method that produces perfectly crispy, golden, and flavorful snacks. Whether you are a seasoned cook or a complete beginner, this process is forgiving and fun. You can customize flavors to suit your mood, from classic salted to spicy cayenne or even sweet cinnamon sugar. In this guide, we will walk you through every single step so you can achieve roasted pumpkin seeds that rival anything you buy at a store.
The beauty of baking pumpkin seeds at home is that you control every ingredient. No hidden oils, no artificial flavors, just pure crunchy goodness. Plus, pumpkin seeds are incredibly nutritious, offering a great source of magnesium, zinc, and healthy fats. Let us dive into the full process and make sure your next batch comes out absolutely perfect.
Key Takeaways
- Easy Cleanup: Rinse and dry your seeds thoroughly before baking for the best texture.
- Perfect Temperature: Roast at 300°F to 325°F for even crunch without burning.
- Seasoning Matters: Toss seeds in oil and salt before baking for maximum flavor.
- Stir Frequently: Stir the seeds every 10 minutes for uniform roasting.
- Cool Completely: Let seeds cool fully before storing to keep them crispy.
- Health Benefits: Roasted pumpkin seeds are packed with magnesium, zinc, and protein.
- Storage Tips: Keep baked seeds in an airtight container for up to two weeks.
📑 Table of Contents
- Why Cooking Pumpkin Seeds In The Oven Is The Best Method
- How To Prepare Pumpkin Seeds For The Oven
- The Best Pumpkin Seed Seasoning Combinations
- Step-By-Step Oven Instructions For Perfect Pumpkin Seeds
- Common Mistakes To Avoid When Roasting Pumpkin Seeds
- Storing Your Roasted Pumpkin Seeds
- Nutritional Benefits Of Pumpkin Seeds
- Quick Tips For The Best Pumpkin Seeds Every Time
- Frequently Asked Questions
- Final Thoughts On Cooking Pumpkin Seeds In The Oven
Why Cooking Pumpkin Seeds In The Oven Is The Best Method
You might wonder why the oven is the go-to method for roasted pumpkin seeds. There are several great reasons that make oven roasting the clear winner over stovetop or air fryer methods.
Even Heat Distribution
Ovens spread heat evenly around your pumpkin seeds, which means every seed roasts at the same rate. This is something that is harder to achieve on a stovetop, where hot spots can cause some seeds to burn while others stay pale. When you use an oven, you get consistent crunchy pumpkin seeds from edge to edge.
Hands-Off Cooking
Once your seeds are on the baking sheet, you can set a timer and walk away. Unlike stovetop methods that require constant stirring, the oven lets you multitask. You can prep other parts of your meal or simply relax while your pumpkin seeds bake to golden perfection.
Batch Size Flexibility
Ovens handle large batches beautifully. Whether you are roasting seeds from one small pumpkin or five big ones, the oven accommodates them all. This makes it ideal for meal prep or sharing with friends and family. You can also easily scale the recipe up or down depending on how many toasted pumpkin seeds you want.
Better Texture And Flavor
The dry heat of an oven creates a uniquely satisfying crunch that is hard to replicate with other methods. The slow roasting process also allows flavors from your seasoning to deeply penetrate each seed. The result is baked pumpkin seeds that are flavorful, aromatic, and perfectly crisp.
How To Prepare Pumpkin Seeds For The Oven
Preparation is the most important step in making great roasted pumpkin seeds. Skipping or rushing this stage will affect the final texture and taste. Follow these steps carefully for the best results.
Step One: Scoop And Separate
Start by cutting open your pumpkin and scooping out the seeds and stringy pulp into a large bowl. Use your hands or a sturdy spoon to separate the seeds from the pulp. Do not worry about being perfect at this stage. You will clean them more thoroughly in the next step. The goal here is just to get the bulk of the seeds into a separate container.
Step Two: Rinse Thoroughly
Place your seeds in a colander and rinse them under cold running water. Use your fingers to rub the seeds together and remove any remaining pumpkin pulp. The slimy texture will come off easily with a bit of friction. Keep rinsing until the water runs mostly clear and you no longer feel any sticky residue on the seeds.
Step Three: Dry Completely
This step is critical and often overlooked. Dried pumpkin seeds roast much better than wet ones. Spread your rinsed seeds out on a clean kitchen towel or several layers of paper towels. Pat them dry gently and then let them air dry for at least 30 minutes. You can also spread them on a baking sheet lined with parchment paper and let them dry for an hour. The key is making sure no excess moisture remains before they go into the oven.
Step Four: Optional Soaking
For an extra crunchy texture, try soaking your dried seeds in salted water for a few hours or overnight. This not only adds flavor deep into the seed but also helps them dry out more evenly before roasting. After soaking, drain the seeds and pat them completely dry again before seasoning and baking.
The Best Pumpkin Seed Seasoning Combinations
One of the best things about making pumpkin seeds at home is choosing your flavors. The seasoning you apply before baking determines the final taste profile of your snack. Here are some tried-and-true combinations to try.
Classic Salted
This is the most popular way to enjoy roasted pumpkin seeds. Simply toss your dried seeds with a small amount of olive oil and a generous pinch of sea salt. The oil helps the salt stick to the seeds and also promotes even browning. This simple combination lets the natural nutty flavor of the seeds shine through.
Spicy Cayenne
For those who love a little heat, mix your seeds with olive oil, cayenne pepper, a pinch of smoked paprika, and a touch of garlic powder. The result is a spicy pumpkin seed snack that pairs perfectly with beer or as a topping for salads. Adjust the cayenne level to match your heat tolerance.
Sweet Cinnamon Sugar
Do not overlook the sweet side of pumpkin seeds. Toss your seeds with a light coating of melted butter, a sprinkle of brown sugar, and cinnamon. Bake them low and slow for a sweet, caramelized treat that works beautifully as a dessert snack or a topping for yogurt and oatmeal.
Savory Herb Blend
For a more sophisticated flavor, mix your seeds with olive oil, dried rosemary, thyme, garlic powder, and a pinch of onion salt. This herb blend creates aromatic toasted pumpkin seeds that taste amazing alongside soups, stews, or cheese boards. Fresh herbs work too, but you will need to use more of them since dried herbs are more concentrated.
Everything Bagel Seasoning
If you love the flavors of an everything bagel, this seasoning is a perfect match for baked pumpkin seeds. Combine sesame seeds, dried garlic, dried onion, poppy seeds, and sea salt. Toss your pumpkin seeds with oil and this blend for a savory, crunchy snack that disappears fast from the bowl.
Step-By-Step Oven Instructions For Perfect Pumpkin Seeds
Now that your seeds are cleaned and seasoned, it is time to put them in the oven. Follow this process carefully for the best pumpkin seed recipe results.
Preheat Your Oven
Set your oven to 300°F. This lower temperature is key to roasting pumpkin seeds evenly without burning them. Some recipes call for 325°F, which also works well and may reduce cooking time slightly. Avoid going above 350°F, as higher temperatures can scorch the seeds before they are fully dried and roasted inside.
Prepare The Baking Sheet
Line a large baking sheet with parchment paper or a silicone baking mat. This prevents sticking and makes cleanup a breeze. Lightly grease the paper with a thin layer of oil if you are not using a non-stick mat. Spread your seasoned seeds out in a single layer across the entire sheet. Do not crowd them. Overlapping seeds will steam instead of roast, leading to soggy results.
Bake And Stir
Place the baking sheet in the center of your oven and set a timer for 10 minutes. After the first 10 minutes, pull the tray out and stir the seeds gently with a spatula. Spread them back into a single even layer. Return the tray to the oven and repeat this stirring process every 10 minutes. Most batches will need between 25 and 40 minutes total baking time.
Check For Doneness
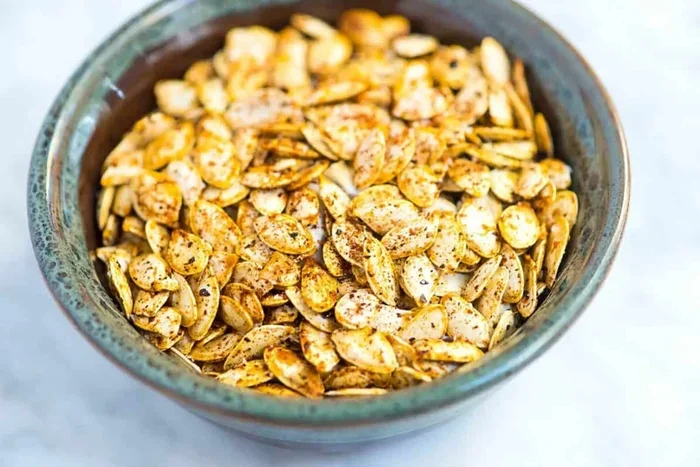
Your roasted pumpkin seeds are done when they are golden brown and the shells feel firm and crunchy. Listen for a light popping sound, which indicates the seeds are roasting evenly. If you prefer a deeper color and more intense flavor, you can bake them for a few extra minutes, but watch them closely to avoid burning.
Cool Completely
Once the seeds are out of the oven, spread them on a clean baking sheet or plate to cool. They will continue to crisp up as they cool, so resist the urge to eat them right away. Cooling also prevents condensation from forming inside your storage container, which would make them soggy.
Common Mistakes To Avoid When Roasting Pumpkin Seeds
Even though roasting pumpkin seeds is simple, there are a few common mistakes that can ruin your batch. Being aware of these pitfalls will help you achieve perfect results every time.
Skipping The Drying Step
Never put wet seeds directly into the oven. Excess moisture creates steam, which leads to chewy instead of crunchy seeds. Always make sure your pumpkin seeds are completely dry before seasoning and baking. This single step makes the biggest difference in texture.
Overcrowding The Pan
Spread your seeds in a single layer with space between each one. Crowded seeds trap steam and roast unevenly. If you have a large batch, use two baking sheets or roast in two separate rounds. The extra effort is worth the perfectly crispy result.
Using Too Much Oil
A light coating of oil helps seasoning stick and promotes browning, but too much oil makes seeds greasy and prevents them from crisping. Use just enough to lightly coat the seeds. A tablespoon or two for a standard batch is usually sufficient.
Setting The Temperature Too High
High heat may seem faster, but it often burns the outside of the seeds while leaving the inside underdone. Low and slow is the secret to perfectly roasted pumpkin seeds. Trust the 300°F to 325°F range and be patient.
Not Stirring Regularly
Seeds on the edges of the pan will brown faster than those in the center. Stirring every 10 minutes ensures all seeds get equal exposure to heat. This small habit takes almost no extra effort but dramatically improves the final result.
Storing Your Roasted Pumpkin Seeds
Once you have made a batch of delicious roasted pumpkin seeds, you will want to keep them fresh for as long as possible. Proper storage is the key to maintaining that satisfying crunch.
Let the seeds cool completely before storing them. Place them in an airtight container such as a glass jar, plastic container with a tight lid, or a resealable zip-lock bag. Store the container in a cool, dry place away from direct sunlight. When stored properly, your baked pumpkin seeds will stay crispy for up to two weeks.
If you want to store them for longer, you can freeze roasted pumpkin seeds. Place them in a freezer-safe bag, remove as much air as possible, and freeze for up to three months. To refresh them after thawing, spread them on a baking sheet and warm them in a 300°F oven for about five minutes. They will taste almost as fresh as the day you made them.
Nutritional Benefits Of Pumpkin Seeds
Making pumpkin seeds at home is not just about taste. These tiny seeds are nutritional powerhouses that deserve a regular spot in your diet. When you roast them yourself, you avoid the excess sodium and additives found in store-bought versions.
A one-ounce serving of roasted pumpkin seeds provides a significant amount of magnesium, which supports bone health and energy production. They are also rich in zinc, which boosts immune function and helps with wound healing. The healthy fats, protein, and fiber in pumpkin seeds make them a satisfying snack that keeps you full between meals.
Beyond the basics, pumpkin seeds contain antioxidants and compounds that may support heart health and reduce inflammation. They are naturally gluten-free, making them a great option for people with dietary restrictions. Whether you eat them as a standalone snack, sprinkle them on salads, or add them to yogurt and oatmeal, they bring both nutrition and flavor to your meals.
Quick Tips For The Best Pumpkin Seeds Every Time
- Use fresh seeds: Seeds from a fresh pumpkin taste better than old or pre-packaged ones.
- Season while warm: Add a light sprinkle of salt right after baking while the seeds are still warm for better adhesion.
- Experiment with flavors: Try new seasoning combinations each time to find your personal favorite.
- Double the batch: Once you master the basic recipe, make extra to have on hand for snacking.
- Keep the oven light on: This lets you monitor the seeds without opening the oven door and losing heat.
- Use a silicone mat: It promotes even browning and makes cleanup effortless.
Frequently Asked Questions
Can I cook pumpkin seeds without soaking them first?
Yes, you absolutely can. Soaking is optional and mainly adds extra crunch and seasoning depth. If you are short on time, simply dry your seeds thoroughly after rinsing and proceed directly to seasoning and baking. The results will still be delicious, though the texture may be slightly less crispy than soaked seeds.
How long do cooked pumpkin seeds last?
When stored in an airtight container at room temperature, roasted pumpkin seeds stay fresh and crunchy for up to two weeks. In the freezer, they can last for up to three months. Always make sure the seeds are completely cool before sealing them in a container to prevent moisture buildup.
What is the best temperature to roast pumpkin seeds?
The ideal temperature range is 300°F to 325°F. This low and slow approach ensures the seeds roast evenly throughout without burning on the outside. Higher temperatures can cause the shells to scorch before the seeds inside are fully dried and cooked.
Do I need to remove the shell before roasting?
No, you do not need to remove the shell. The shell protects the seed during roasting and adds a satisfying crunch when eaten. Most people enjoy roasted pumpkin seeds with the shell on. If you prefer shelled seeds, you can remove the shells after roasting, but this is a time-consuming process and not necessary for most recipes.
Can I use a toaster oven instead of a regular oven?
Yes, a toaster oven works great for roasting pumpkin seeds. The smaller size means you may need to stir the seeds more frequently since heat distribution can vary. Keep the temperature at 300°F to 325°F and monitor the seeds closely to prevent burning.
Are pumpkin seeds healthy?
Absolutely. Pumpkin seeds are rich in magnesium, zinc, protein, and healthy fats. They also contain antioxidants and fiber. Making them at home allows you to control the amount of salt and oil, making them a healthier snack compared to many store-bought options.
Final Thoughts On Cooking Pumpkin Seeds In The Oven
Learning how do you cook pumpkin seeds in the oven opens up a world of delicious, healthy snacking possibilities. The process is simple, affordable, and incredibly rewarding. From scooping out your pumpkin to pulling a tray of golden, crunchy seeds out of the oven, every step is satisfying in its own way.
The key to perfect roasted pumpkin seeds lies in thorough drying, even seasoning, and patient roasting at a low temperature. Resist the urge to rush the process. Good things come to those who wait, and your taste buds will thank you for it. Whether you go with classic salted, spicy cayenne, or sweet cinnamon sugar, homemade pumpkin seeds are hard to beat.
Now that you have all the steps, tips, and tricks, it is time to grab a pumpkin and give it a try. Once you master this simple technique, you will never buy store-bought roasted seeds again. Cooking pumpkin seeds in the oven is a skill that pays off with every single batch. Enjoy the process, get creative with your flavors, and savor every crunchy bite.